Hamir Hasip (Beef Dumpling) Recipe
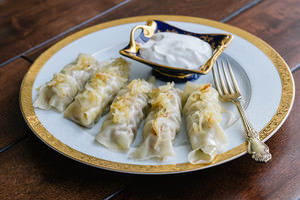
The very first time I ate these dumplings were in my mom’s kindergarten where the cook makes delicious, from scratch meals every day. Although I have heard of Hamir Hasip (in literal translation it would mean Dough Sausage) before, as it is an Uzbek dish, it was never made in our house. When I tried them for the first time, I really fell in love with their simple but delightful taste. These beef dumplings do not have a big variety of ingredients in it, which, in my opinion, make them appealing to little children. You can certainly dress them up with a spicy or sweet chutney, sour cream or plain yogurt. I like to enjoy it with a little bit of caramelized onions in ghee, sour cream and a side of pico de gallo.
Servings: 10 +
Ingredients
- DOUGH INGREDIENTS:
- 2 tsp salt
- 2 cups of warm water
- 4 cups of flour
- 1 egg
- 5 Tbsp liquid oil of your choice will not be putting in the dough. Needed as a rub before putting on the steamer
- FILLING INGREDIENTS:
- 2 lbs of 80% ground beef
- 2 medium onions
- 2 cups of California Rose rice
- 4 cups of water
- 1 + tsp salt add more salt if needed
- 1/2 black pepper
- 1 Tbsp cumin
- Optional: 2 Tbsp Avocado Oil Ghee or Liquid oil of your choice
- Note: I didn’t not add oil this time around because I used a higher fat percentage ground beef. Next time I think I will use either ghee or avocado oil to compensate a little dryness, which might derive from using rice in this recipe.
Instructions
- Dissolve salt in warm water, add 1 egg and slightly whisk everything together. Add flour and quickly kneed the mixture into a soft, smooth dough. Err on the side of caution regarding flour. It is so different everywhere. Choose to add 2 cups in first, and a cup following the first two until no more flour remains or the dough doesn’t need all 4 cups. This could be done in order to make sure you have the dough of the right consistency and softness.
- You can also use the stand mixer with the dough hook attachment to kneed the dough for you. Whatever works, really. There is no right or wrong here. Just take out the dough from the mixer and give it a final kneed on the table before you shape it to a ball and cover it up (plastic wrap works, too) in order for the dough to rest. Make sure the dough rests at least 15-20 minutes before starting to work with it.
- Cut onion in smaller chunks to fit in the chopper. Chop the onions and set it aside. Again, this process can be done by hand, in case you do not have a food processor or a chopper.
- Wash the rice and place it on a medium skillet. Add water and turn the heat on medium high, in order to cook the rice just a slightly bit. Bring the water to slight boil and keep the rice at this stage for 3-4 minutes. Once the time is up, carefully place the rice in the strainer and get rid of the extra liquid. Set the rice aside until further use.
- Using a large bowl start gathering the ingredients of the filling in one place. Place ground beef, chopped onions, spices, salt, rice in the bowl and mix all of the ingredients well. If you are using oil to make the mixture a little more tender and juicy, this is where you add it.
- Take out well rested dough and sprinkle it with flour. This will also help the dough from sticking to itself during the process of rolling it. Press the dough into a large, flat pancake. This process will make it easier to catch the dough into a rolling pin and roll the dough into a large circle. For more precise instructions on how to roll the dough, please follow the step-by-step photos. I have a huge rolling pin, which is basically a lumbar piece I bought from Home Depot. Make sure to choose a straight piece to ensure an even roll. Sand the wood down multiple times, wash well and you have a perfectly functioning rolling pin, which will give you great flexibility while rolling large dough.
- Note: Place water to boil in the bottom layer of the steamer. Follow the directions of the particular steamer you are using. By the time you are done folding the dough, the water should be boiling and ready.
- Once the dough reaches the desired circumferences, a thinness of a wonton wrapper, wrap the dough around the rolling pin and slowly release the dough by zigzag-stacking it on its own layers measuring about 6 inches in width. Use a ruler or a mold to help you cut the long strip into squares which measures about 6 inches wide.
- Now you have strips of dough which you will stack one on top of another and repeat the process of cutting the line by 6 inch increments. You have successfully created square dough, which now can be stuffed with the filling. Spread the squares on the working surface.
- Place about a TBSP of the filling in the closer corner of the squares, in a cylinder shape, leaving an inch of space from that corner. Fold the empty 1 inch space over the meat filling and roll the dough along with filling one more time. This way the filling is nicely blanketed in a tube. Fold two opposing “ears” of the tube inwards by pressing gently and roll the tube one more time effectively creating a cylinder shaped dumpling (Follow the photo directions for precise instructions).
- Put the oil for dipping in a deeper dish and dip the dumplings slightly with the side which will go on the steamer sheets. Immediately place the dumplings on the steamer sheets and repeat the process until you are done with all the dumplings. Another way would be to moderately grease the steamer sheets and just put rolled dumplings on them, instead of individually dipping the bottom of every dumpling in oil. I just find dumplings have an easier time detaching from the sheets after they are done cooking, if the bottoms are actually dipped. Whichever way works for you. Once you are done placing the dumpling, dip a brush in remaining oil and give gentle strokes over the dumplings with it.
- Another way of rolling the dough is cutting tiny 1/2 inch balls and rolling them to a thin pancake with a smaller rolling pin. the dough needs to be thin for these dumplings to be successful, don’t be afraid to roll it out thin. Place the filling on the edge of the circle and roll WITHOUT tucking the “ears” in. I find this method yields more gentle and tender dumplings.
- The water on the bottom of the steamer should be boiling before you stack all the layers of the steamer in place. The last thing you want are soggy, dripping, under-cooked dumplings, which happens if the water is not boiling. Also make sure the bottom has adequate water, don’t burn the steamer leaving little water in.
Notes
You will need to use a steamer for this recipe. I bought my steamer a while ago from a Korean Market, in Denver. Chances are you will have a market like that in your city or neighborhood. Go check them out. Even the smallest ones might stock some sort of a steamer pot. I am used to making my own dough for the recipes I use at home. Should you need an alternative to the dough described in this recipe, feel free to use either wonton dough or pre-cut, pre-made dumpling dough from your grocery store. There is no shame in utilizing available products. As long as you are happy with your choice.